restarting the mojo

It’s happened enough times now that I’m able to recognize a fairly distinctive pattern in how I operate, especially in how I tend to approach and deal with the aftermath of failure.

— Immediately following ‘x‘ event, I’m still pretty gung-ho about giving it another go — it may have beat me, but hey, it was a good learning experience and now I know for next time…and there will be a next time.

— After some dwell time, I start brooding and feeling sorry for myself, and generally entertaining “why bother?” types of thoughts. Because I’m clearly not meant to do whatever it was I was attempting, since I failed at it.

— I either get sick of my own attitude, or some outside force intervenes and drags me back into the fold of whatever I was distancing myself from, and I’m reminded of why I like ‘x‘ activity in the first place.

The latest event to throw me into this cycle was, of course, my DNF at the Crown King Scramble 50k. Not only was I physically broken, but my mental psyche took a pretty good hit, too, and I was having a really hard time remembering why I thought this whole running thing was a good idea in the first place.

I guess that’s one of the hazards of the “jump into the deep end” approach…there’s a greater risk of failure than a more cautious approach. But at the same time, I suppose I’m at optimist at my core, because I tend to have a “you don’t know until you try” outlook.

And I will say, for the most part, on things I’ve failed at the first time around…I’ve come back to them again and been successful.

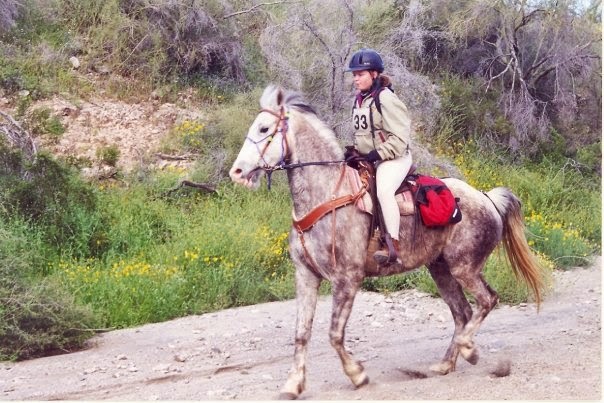
It was disheartening to pull from the first 50 I ever attempted…and to have to cancel my entry before the ride on my first two attempts to get to a 50 with Mimi…and to get thoroughly beaten by the trail at Man Against Horse…and to have a crappy running season…

But in the long run, I’ve managed to pull a lot of those monkeys off my shoulder and stuff them into a zoo where they belong. It took me seven years, but I got back to that ride scene of my inglorious first pull, and under similar circumstances (same trail, another borrowed horse), I finished it (Old Pueblo 2013).

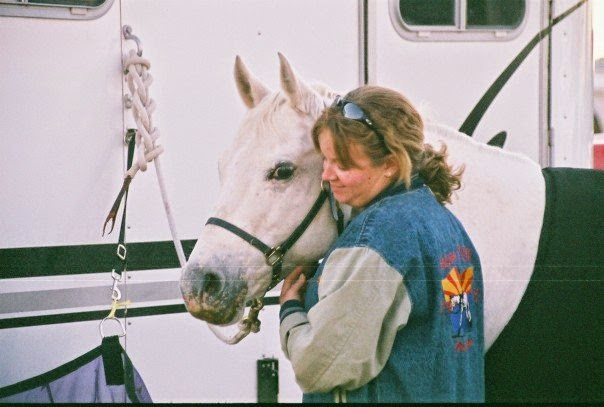
That first 50 with Mimi was a wonderful experience. By inadvertently being forced to wait (things like saddle fit and her getting bitten on the back), it meant that Dad and I would tackle that first 50 together…as so many of our trail adventures have been shared together, it seemed only appropriate that a big leap into endurance would also be shared.

2008 Man Against Horse may have been a disaster, culminating in getting pulled for “likely being overtime”…but I took everything that went wrong that year and funneled it into a “how to do better” approach…and in 2009, we had pretty much a perfect ride. That finisher’s buckle is one of my more treasured possessions. But after 2008, and two crappy back-to-back rides/pulls, I was ready to throw in the towel…in fact, I didn’t even ride the pony for a couple of months. And then a friend offered me a horse for the 2009 Wickenburg 25, which I accepted…we had a great ride, Top Tenned, the fire to ride got reignited, and the next month, dragged the pony back into action fora successful 50-miler.

Three-and-half so-so miles still beats zero miles

And last night, I ran for real for the first time since Crown King (end of March). It wasn’t all that pretty at times…but it got done. And really, it was just my cardio that had suffered. Fortunately, I’ve still been walking the dog every morning…and I snuck a 3-day, 25-mile backpacking trip to the Grand Canyon in there. 

I can easily fall into somewhat hermit-esque tendencies, especially when I’m hosting a personal pity party, so it does me a world of good to get out of the house, do something, and be around people who share a common interest.
Last night might have been a bit of a rough run, but good times with friends more than made up for it, and got me remembering why I thought this was a good idea…if not for the running itself, then for  the community.
Having such an encouraging, positive, supportive environment really helps, too — the “you failed” mentality is entirely of my own design, and all the feedback I’ve gotten has been positive encouragement that I even tried such a race as my first ultra attempt.
As far as coping strategies go, I’m not sure mine ranks in the Top Five Recommended Ways to Handle Failure…but at least I recognize how I operate? And that I eventually manage to get back on track?

learning to tell the story

So I’m a bit behind…I owe you guys three run write-ups, a 26k from Jan, a 35k from Feb, and a half marathon from this past weekend. The 26k was awesome, was just waiting on the forensic evidence pro photos…but the 35k was not-as-good…and those are the stories I struggle to tell.

I’ve come to the realization I have a habit of either skipping the bad stuff, or giving it a footnote mention. Mainly because I’m not sure how to talk about it. Especially when it comes to endurance and the horses.

Some things don’t make the blog because they fall under the header of “personal” or “can’t do anything to change it so not going to complain/talk about it.” And other things…I don’t know. Sometimes it’s due to diplomacy (especially under the topic of “Other Peoples’ Horses”) and politics  and politeness and being raised to not air my dirty laundry to an unsuspecting public.

But the badder times on my own pony? I dunno. I realized I’ve never gone into major detail of any of my “pull” rides with her. Maybe because I was usually in a funk afterwards and didn’t feel like revisiting them…or maybe because I didn’t want to be judged/criticized/scoffed at.

And that’s a mindset I need to change…maybe I coulda/shoulda/woulda done something different…or maybe there was nothing I could have done to change an outcome…but they’re all learning experiences, for better or for worse, and ultimately deserve their time in the spotlight. Maybe I screwed up…and maybe someone will learn something from it. (Or it’ll at least serve as a Reminder To Self.)

I’m not out to detail every blip or detail of my day (my life isn’t that exciting/interesting, for one), and some things, due to the aforementioned reasons of diplomacy/politics/politeness, are better left for private conversations, but I think I can do a better job of learning to tell the story — the good and the bad — and embracing the learning experience.

Sometimes I wish I had been blogging back when I first started distance riding. I sort of did, in a way — a personal journal, the sort that will never see the light of day — but I would have liked to have a more detailed record of some of my earlier rides. I have photos, and I have vet cards, and generally a “best of” highlights reel that plays in my head, but it’s only been in the last few years I’ve started doing really detailed ride stories (mostly for my benefit, because I enjoy writing them, as well as for future reference…and I know how much I enjoy reading others’ ride stories).

a waaaaay before blogging moment…Mimi and I at the POA
World Show in Spanish Fork, UT, July 2002…our last show ring
hurrah, and the final events/points needed to get her Supreme
Championship in the POA registry.

So that’s my task…I’ve got the stories…now I need to tell them. :)

Getting Started in Distance: It Doesn’t Have to Be Complicated

One of the big obstacles I see/hear about when it comes to people getting into distance riding is that it’s overwhelming, they don’t know where to start, and don’t want to “mess it up.” (Hey, I’m still there on that last one.)

I’m going to make it simple: Start with what you have.

Seriously.

The basics you need are (and this is just my opinion, FWIW, based on my own personal experience): A fit, sane, sound horse; a saddle that fits your horse and yourself; a tack set-up that fits and offers control; a way to carry water/snacks for yourself; a way to get to/from the ride.

  • The Horse: Yes, Arabians are the most popular breed in endurance. They excel at long distance in that they have been bred, physically and metabolically, for this sport. That doesn’t mean other breeds can’t do distance. The record for highest number of Tevis completions is held by a Quarter Horse. Start with what you have, as long as they are fit, sound, and sane. Some breeds may need more, or different, conditioning than an Arabian.

I would not recommend starting out with a horse with known physical or metabolic issues; distance riding is a challenge and managing a horse with known issues puts you behind the curve and makes it that much harder.

But you also don’t know what your horse can and can’t do until you ask. I never imagined my show pony would could ever be a safe trail horse, let alone compete in distance riding.

She proved me wrong. Ultimately, age and prior use caught up to her and ended her distance career far earlier than either of us were ready for; but she did me proud and I have no complaints.

So before you rush out and buy a brand-new horse for a sport you haven’t done, evaluate your current herd first and see what a good base of conditioning produces. (And then go horse shopping after you’re hooked on endurance…many of us operate with more than one horse. ;))

“Non-Arabians can’t do distance.”
Really???
Mimi may
look like a little grey Arabian mare, but she’s a registered Pony Of the Americas (POA) with a POA sire, and full QH dam.
  • The Saddle: If what you’re riding in works, start with that. There’s no reason to rush out and spend money on a new saddle — again, for a sport you may or may not like — if what you are currently using fits you and the horse and is comfortable. There’s a good chance your horse’s body shape may change as he gets fitted up, and you may need to saddle shop at that point, but there’s no point in spending the money before you have to. Or you may discover that your saddle that is great for a couple of hours isn’t so great after 25 miles, but don’t assume the worst right away.

I started distance riding in my gymkhana saddle: a cordura Big Horn. It fit Mimi, it was comfortable enough for me, it was secure, and I could attach gear to it. After I stopped showing, I sawed the horn off the saddle so I would quit poking my ribs into it on uphills, but I ultimately used that saddle off-and-on all through my distance career with Mimi, and I still have it as a back-up saddle.

If you do end up saddle shopping, network around — if someone near you has a style you’re curious about, ask to sit in it or try it out. (I’ve been able to try more saddles that way and figure out if I like them or not.) There is also an extensive used tack network that exists in the endurance world, since we’ve all been or are in the process of being in the saddle shopping boat.

But if you’ve been logging saddle time and conditioning miles in your current set-up and it’s working, stick with that, at least through your first couple of rides.

  • Other Tack: See above — start with what’s been working. The bright colors and matching tack is so tempting…and also not cheap. We all want to look good, especially when showing up to something new…but my advice would be to give it a few rides before splurging at the distance supply stores. All you really need is a halter/lead to tie with, a bridle that offers solid communication and control, and if you’re going to be doing hills and have a saddle that potentially slips back, a breastcollar (or a crupper if it slips forward).

I came out of the show ring, so most of my tack was leather, and some of it even silver-encrusted. Leather, although it smells wonderful and feels even better, generally doesn’t do well in the salt-and-water-heavy endurance environment. In other words, you’re going to spend as much time cleaning your tack as riding, if you don’t want it to wear prematurely and weaken. I did have my day-to-day nylon training gear, and that’s what I started with for conditioning gear.

I will say that if you’re coming out of a very different background (show ring, just for example), you may not have some of the necessary gear: like I didn’t have a breastcollar, and Mimi’s size difference meant the spare one my dad had for his horse really didn’t fit…so I did have to buy that.

But if you’re going to have to buy something, search that used tack network. It helps if you’re flexible on color, or start with a basic black. I know how much fun it is to try to decide what color is going to look the best on your horse — believe me, I still like doing that — but I would recommend holding off on spending money until you decide this really is the sport for yourself and your horse.

My first NATRC ride ever: borrowed an experienced trail horse
that came with his own gear; I just added newbie distance rider,
overkill saddle bags, and my own reins. The breeches, helmet, and
paddock boots were what I used  for schooling.


By the time Mimi and I did our first ride, we were fairly well
put-together, but mostly through necessity of figuring out during
training rides that “What I Had Didn’t Work.”
  • Water/Snack/Gear Carrier: For anything over 20 miles, you’ll probably want some way to carry water and snacks for yourself, as well as a small on-trail kit (small first aid kit, bandanna, vet wrap, cactus comb if you’re in the desert, carrots). This could be in the form of carrying it on your person, such as a Camelbak, or some kind of saddle packs. Endurance-specific saddle packs are designed to be bounce-free and low-profile, but some snaps and baling twine can secure standard saddle bags down in a pinch (I didn’t know any better, so that’s what I used on my first distance ride).
  • Transportation: Most rides tend to be a distance from where people live, so driving there is a necessity. If you have your own vehicle/trailer, you’re all set. Work with your horse so that they tie comfortably to the side of the trailer, have a bucket for water and some sort of hay delivery/containment method, and you’ll be set. Once you decide this is the sport for you and your horse, you can explore other equine-containment systems such as high ties or portable corrals. (I hard-tied Mimi off to the side of the trailer for a number of years with no problems, and some experienced endurance people still prefer this method as one of the safest and most secure methods; since they have less space to move, you just may need to hand-walk them a bit more often.

If you are truck-or-trailer-less, there is still a way. Back to that good old networking thing: see if someone around you may be willing to trailer-pool to the ride. If you find someone willing to share their ride with you, it’s nice to: offer to split travel expenses, have a horse who is a well-mannered traveler (why I actually don’t like trailer-pooling in other people’s rigs: Mimi kicks, and has scuffed or torn up a number of rubber wall mats), be ready in a timely fashion, and be organized and have all of your stuff condensed together as much as possible.

Because my dad and I did all of our rides together, we were our own “trailer-pooling” entity, but I’ve also done some rig-sharing when riding other people’s horses, and it can be a lot of fun. Good company makes a (sometimes long, boring) drive go by a lot faster (and it’s nice to have a free set of hands to raid the cooler, and open bags and water bottles), and two sets of hands make camp set-up go smoother and faster as well.

You also don’t need a fancy living quarters trailer to do this sport: for years, we successfully used a 2-horse slant-load trailer, and a combination of the dressing room, back of the trailer, or back of the SUV for sleeping arrangements. Yes, living quarters are a nice luxury — but there are a lot of people who still pitch a tent. You will see all sort of set-ups at a ridecamp; everyone figures out what works for them, their budget, and their camp needs.

Before I eventually got a Hi-Tie, Mimi successfully hard-tied to the trailer for years.


“Roughing it”, endurance-style: I slept in the front dressing room
of the trailer; Dad set up a cot in the back. Coolers/food table
was also set up in the back, and tack was spread between the rear
tack compartment and the front dressing room.

The biggest “takeaway” advice I have to give is that really, there is very little out there that is a “right” way or “wrong” way if the end result is a fit, sane, sound, comfortable endurance horse, and a comfortable rider. It’s the ultimate in “just because everybody else (or what seems to be like everybody else) does it, doesn’t mean you have to.” Sometimes there is a reason for the popularity of something (like the sturdiness and ease of cleanup of biothane tack), but it never hurts to ask why and the reasoning behind a particular action.

certainly don’t have all the answers, of even half of them…just my own personal experience to draw on and relate to others. I’ve made mistakes, and I’ve done things right…pretty much like the most of us who dip our toes into the distance riding pool and decide to swim. :)
(PS: If anyone has an endurance questions they want to ask me, I am always open to email inquiries — see the ‘Contact’ sidebar towards the top of the page.)

cross-training

Coming out of the show world, I’m a huge proponent of cross-training for the endurance horse. It’s not just about getting them fit and going down the trail: I expect my horses to be responsive to seat, leg, and rein aids, to give to the bit, the use their hind end to provide impulsion, to carry themselves comfortably, and be solid and comfortable at a walk/trot/canter.

It probably helps that I actually like doing schooling and arena work. There is something predictable and immediate about it…a mix of instant gratification (well, sometimes…) and long-term results. I’m not talking about just drilling endless circles around the ring…that’s boring. I’m talking about mixing it up, incorporating things like trot poles, cones, barrels, and other brain exercises into schooling routines that help create a more supple, responsive, endurance horse.

I’ve been fortunate enough that all of the barns I have boarded at have been performance oriented, so I have always had access to things like cavaletti poles, jumps, cones, barrels…and arena space. Some places have had larger arenas than others…currently, I have access to about a 180’x75′ sand arena, which is plenty of space to do w/t/c drills, as well as all sorts of trot pole patterns or weave cones.

Basically, the faster you want to school, the more space you need…but basic trot poles can be done at a walk in a pretty small space…and if you’re just starting out, most of what you’re going to do is at a walk or trot anyway.

I’ve pulled a lot of inspiration and schooling exercises from patterns learned during my time in the show ring. Reining and gymkhana patterns, or modified versions of parts of them, are great bending and suppling exercises.

Traffic cones and trot poles are usually the easiest things to come by, and take the least amount of room to store, so that’s what I’ve used as my illustrations. For trot poles, I like finding the heaviest wood ones that are still manageable — they’re less likely to bounce  and roll if the horse hits them, and I’ve had enough occasions where a solid whack of the hoof on the pole was enough to get them to start lifting their hooves. PVC gets brittle here in the sun — one tap of the hoof and it will shatter — plus, they’re lightweight and roll at the slightest tap, so you’ll be constantly resetting poles.

It’s really nice to have a helper on the ground when it comes to setting poles, but after a time or two, you’ll learn what the best spacing is for poles and what your horse’s stride length is most comfortable at. I don’t get too worked up over having things perfectly spaced and aligned, either…because I’m also trying to teach them to pay attention to the ground and their feet, and adjust their stride accordingly, which may mean imperfectly spaced poles/uneven ground surface.

Just some (bad) illustrations of some of my favorites: (Disclaimer: My horse-schooling skills are better than my Paint drawing skills.)

Flat Poles
The basic flat trot poles: Great for working on straightness, paying attention to their feet, and using their hind end for impulsion. The spacing given for each gait is a rough guideline and place to start: you may have to fine-tune the spacing for your individual horse’s stride.
The Circle:
 This one is fun. Great for working a circle, and on bending and impulsion at the same time. The faster you go, the larger you’ll want to make the circle/space the poles. Definitely a challenging one…start slow and work up.
 Staggered Poles
Similar to the straight poles, but really gets them lifting their feet and driving forward. Having jump standards or pole blocks of some sort really work the best here to lift the end of the pole. In a pinch, I’ve scraped sand into a pile on one end, or have used concrete blocks (just be aware that if you stick the pole in the inside of the block, it won’t go anywhere should the horse hit it and they could trip/catch themselves).
The Box
Endless possibilities! You can do loops around and cross through the box, stop inside of it, work on turns inside, use it as a transition point (walk in/trot out, trot in/canter out, and the inverse — which is harder to go fast and then slow down). One of the best all-around exercises and leaves a lot of room for creativity.
The Fan
Like a combo of flat poles and the circle…works them on foot awareness and lifting their backs. Would only recommend at the walk/trot…spacing on these is really tricky at the canter and requires a lot of room.
 The L
Stolen from the dreaded trail course back-through obstacle, if spaced wide enough, can be walked or even trotted through, or use the poles as trot poles and make loops and circles around/over the poles.
Figure 8 Cones
The cones aren’t really necessary to do circles and shapes schooling, but sometimes it helps give a good visual aid, especially on keeping circles even and consistent.
Circle/Spiral Cone
 The basic exercise is just a circle around the cone — work on consistent size and even distance from the cone. Great for flexibility, bending, working off leg, and even pacing. To make it more challenging, start at the cone and gradually spiral out, then spiral back in.
Weave Cones
Two exercises, one drawing. The light purple path shows an exercise that will work on more exaggerated bending and straightening, while the light green path would be more working off leg and efficiently moving through the cones. Goal on that is to get close to the cones and move off of leg, versus over-steering with the reins. (May save your knee from slamming into a tree trunk.)
Not illustrated is the rail exercises (which do need more of an area/larger space: the beauty of a lot of suppling/pole work is unless you’re working at speed, it can be done in a smaller space): a common one I’ve encountered is to speed the horse up on the long side of the area, then ask them to slow on the short side. This is supposed to help with the speed up/slow down requests on trail…Mimi, in typically Mimi fashion, likes the speed up part…but not so much the slow down part.
I also do a lot of circles off the rail, direction changes, leg yield off the rail and back on, ride deep into corners to work on bending, lots of transitions and gait changes…basically, try to keep things interesting and make an arena schooling session count towards “putting something in the bank” that will be beneficial on the trail.
If you have questions/need clarification, let me know…and if you have your favorite arena exercises, please share!!

forget-me-not

As anyone who has spent any time around me knows, I am a compulsive list-maker. Especially for things like rides, runs, or anything that involves me remembering stuff that is out of the ordinary. I have checklists, broken down into applicable categories (“tack”, camping gear”, “rider clothes”, etc), that I print out before every ride. I live with post-it notes stuck everywhere: reminders of what to buy, when to expect packages to arrive, how to organize items.

(Currently, I am staring at a list for an upcoming trail race that will involve putting together 4 different drop bags for a point-to-point course.)

I wasn’t always this way.

I had to learn the hard way about the value of having a hard copy list, not just skimming through the mental checklist.

My most epic fail moment (to date) of forgetfulness was back in my show days. I had traveled out to California with my trainer for a weekend-long show…and when I went to tack up for the western classes, discovered that I had my felt liner pad, but not the decorative wool blanket for on top.

Not quite the end of the world…but in a fairly competitive environment, where details matter — this mattered.

While I was busy having a meltdown, my parents (who had traveled out to the show to surprise me), did some fast networking and procured a spare pad (color-neutral enough to work with my turquoise outfit) from another rider’s parents.

Turns out that rider was Kaity Elliott. At that point, we knew each other in that vague “I know that girl and her very spotty (Kaity)/very white (me) pony” way. But the “saddle pad incident” made us more than just vague acquaintances and competitors. We started talking to each other. And hanging out together at shows. And the rest, if you’ve been following this blog for any amount of time, is history, of our shared adventures in distance riding, horse borrowing, crewing, and other shenanigans. A lifelong friendship, all formed over a forgotten saddle pad.

The only other (I’m jinxing myself here…) thing I can remember for an event was the Sage Hill NATRC ride in 2002, in which I discovered halfway through the drive out that I forgot my half chaps and water reservoir for my hydration pack. Neither were deal-breakers, although I was convinced that since I was riding English, the stirrup leathers were going to pinch and rub my legs raw (they didn’t), and that if I didn’t have water on my person, I was going to die of dehydration (and since I’m sitting here writing this today, I obviously didn’t). It was a 20-mile ride in the Santa Ynez mountains in November…I’m pretty sure I still even had water in my water bottles on the saddle by the end of the ride.

Of course, just last month I went down to the barn with the intention of riding…only to discover I had left my girth at home. Not the first time that’s happened, which is one of the hazards of using your garage as your tack room and driving everything between your house and your horse. Sometimes it results in an impromptu bareback ride, sometimes in a pony lunging session, and sometimes in a “screw it, have a cookie and go back out to the pasture” approach.

The main thing that has contributed to me forgetting stuff? Doing something out of the ordinary and not putting it back in place. In the case of the water bladder, I had pulled it out to clean it and left it out to dry. I remembered my hydration pack…just forgot to retrieve the bladder. Same deal, same time with the half chaps: had washed them, hung them to dry, and assumed they made it back into the bag with all of my rider gear (helmet, half chaps, GPS, etc).

These days, I’ve gotten pretty good about keeping things organized and “in their place” and have a routine of where to grab what…but ultimately, it’s my checklists that keep me in line and organized. And I make sure that before I have something checked off the list, I have physically put my hands on it, can account for it, and know that it is packed where it needs to be.

(Working on putting my checklists into a printable .pdf file if anyone is interested…I may start compiling informational things such as my packing lists into a separate information page on here if there is enough interest.)